Hadron: Recreate the Demo - Custom Home Page Content
Your Guide to Using the Hadron Theme for Magento
Introduction
The Hadron homepage uses some additional HTML, as well as an extra template for displaying some CMS static blocks, while still using the HomepageGrid template to show a selection of products. The entire code for the "content" area of the homepage is as follows:
    <div class="module-surround">
        <div class="module-title">
        <h2 class="title"><span>A contemporary and flat design approach with rich animations</span></h2>
        </div>
        <div class="module-content">
            <div class="customrt-center">
                <p>Flat visuals are the central design feature of Hadron, providing a modern, corporate approach to template construction.</p>
                <div class="rt-readon-group">
                    <a class="readon" href="#">Purchase Now</a> <a class="readon2" href="#">Read Features</a>
                </div>
            </div>
        </div>
    </div>
    <div class="promowrapper">
        <h2 class="title"><span>Latest Featured Works</span></h2>
        <p class="fp-feature-content">The template also supports a simple coming soon or offline style page with a time counter.</p>
        <p class="fp-feature-content">It has been specifically styled to match Hadron.</p>
        {{block type="core/template" cms_block_ids="10,11,12,11,12,10" template="carousel.phtml"}}
    </div>
    <div>{{block type="catalog/product_list" name="rokmage_homepage_grid" template="rokmagemodules/rokmage-homepagegrid/rokmage-homepage-grid.phtml"}}</div>
The module-surround section has two buttons you can link to pages on your store. Simply replace the # symbol in the href with the url you wish to point to.
The promowrapper section has a call to a new template file, which displays static blocks in a carousel. You should use a minimum of six blocks to match the design, but you are free to add as many as you wish (in batches of 3). First you will want to set up your static blocks. The HTML for the content areas of the blocks should be as follows (title and ID are irrelevant and can be whatever you choose):
    <div class="sprocket-strips-item">
        <div class="sprocket-strips-image-container">
            <a href="#"> <span class="sprocket-strips-image-overlay"> <img src="/{{media url="wysiwyg/cms1.jpg"}}" alt="" /> </span> </a>
        </div>
        <div class="sprocket-strips-content">
        <h4 class="sprocket-strips-title" data-strips-toggler=""><a href="#"> Paradigm </a></h4>
        <a class="readon" href="#"><span>Read More</span></a></div>
    </div>
Again, change the href in the links to point to your decided location, and replace the image with one of your own (dimensions of 500px wide by 300px tall).
Once you have set up your 6 static blocks, make note of the block_id of each. You can see this in the URL for editing the blocks - it will appear in a tooltip on hovering:
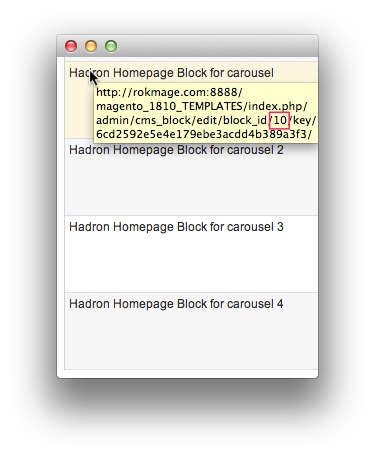
If you have made six in succession, they will likely be something like 7,8,9,10,11,12. Add these to the template call in your cms homepage and they will get pulled through to the frontend:
{{block type="core/template" cms_block_ids="7,8,9,10,11,12" template="carousel.phtml"}}
Save and check your homepage.
Social Media Links
There is also a cms block for showing social media links. This is added via a widget instance. First, create a static block with the following html:
<div class="rt-social-buttons">
<a class="social-button rt-social-button-1" href="http://www.facebook.com/RocketTheme" target="_blank"> <span class="icon-facebook"> </span> <span class="social-button-text">Facebook</span> </a>
<a class="social-button rt-social-button-2" href="https://twitter.com/rockettheme" target="_blank"> <span class="icon-twitter"> </span> <span class="social-button-text">Twitter</span> </a>
<a class="social-button rt-social-button-3" href="https://plus.google.com/114430407008695950828/posts" target="_blank"> <span class="icon-google-plus"> </span> <span class="social-button-text">gPlus</span> </a>
<a class="social-button rt-social-button-4" href="http://www.rockettheme.com/blog?format=feed&type=rss" target="_blank"> <span class="icon-rss"> </span> <span class="social-button-text">rss</span> </a>
<div class="clear"> </div>
</div>
Swap out the links for your own. Then, go to CMS->Widgets and create a new widget instance, selecting your newly created block in the Widget Options and setting the rest as follows:
