Hexeris: Adding Widget Instances
Your Guide to Using the Hexeris Theme for Magento
Introduction
There are two CMS blocks used in Hexeris, both of which are added via Widget Instances.
-
 1Home Page Block2Social Links Block
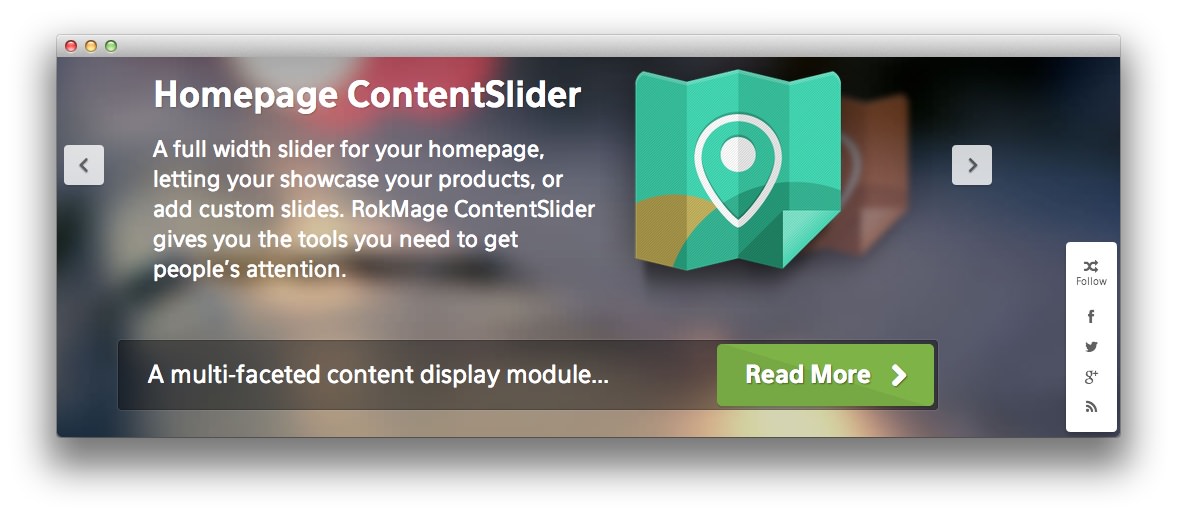
The first is the long bar with the text reading: A multi-faceted content display module... and a Read More button, as seen on the demo homepage.
The second is the floating social links box, visible on all pages on the demo.
Home Page Block
The first step to making a new CMS static block is to navigate to CMS -> Static Blocks and click the Add New Block button.
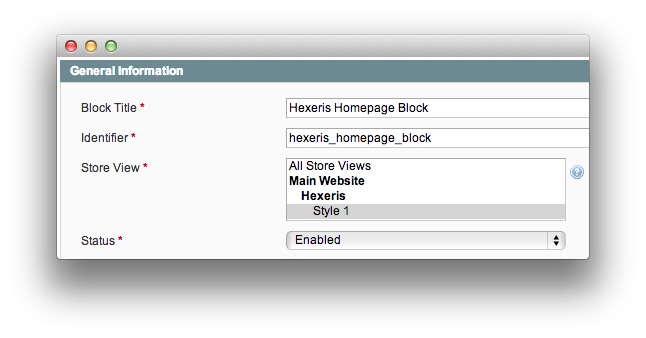
For the Home Page block, use the following settings:
| Option | Setting |
|---|---|
| Block Title | Hexeris Homepage Block |
| Identifier | hexeris_homepage_block |
| Store View | Style 1 |
| Status | Enabled |
To replicate the block as it appears in our demo, enter the following as the Content (disabling the WYSIWYG editor before pasting):
<div class="homepage-block hidden-phone">
    <p>A multi-faceted content display module...</p><button class="button"
    onclick="setLocation('http://rockettheme.com')"><span>Read More</span></button>
</div>
NOTE: The
setLocation('http://rockettheme.com')area of the code sets the link visitors will go to when they click the button. Replace the URL with a link of your choice.
Once this is done, select Save.
Next, you need to create a widget instance to add the block to the frontend.
To do this, go to CMS -> Widgets and click the Add New Widget Instance button.
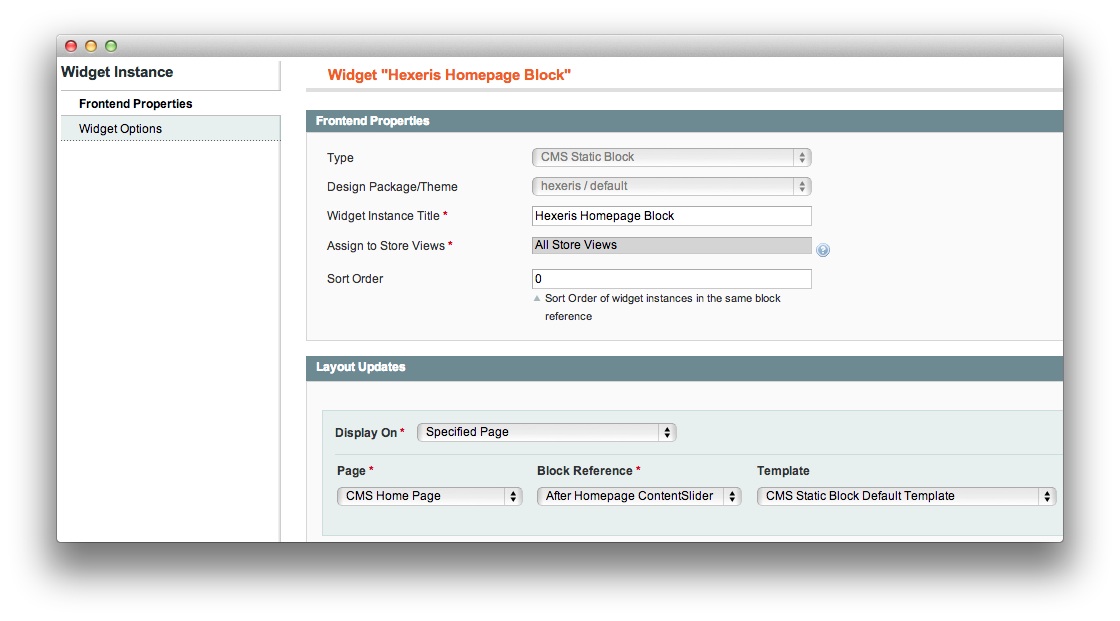
Set the Type to CMS Static Block, select the hexeris / default package, and add the following settings:
| Option | Setting |
|---|---|
| Widget Instance Title | Hexeris Homepage Block |
| Assign to Store Views | All Store Views |
| Sort Order | 0 |
| Display On | Specified Page |
| Page | CMS Home Page |
| Block Reference | After Homepage ContentSlider |
| Template | CMS Static Block Default Template |
Then, choose your CMS block Hexeris Homepage Block under the Widget Options tab, and save.
Social Links Block
As with the previous block, you will need to navigate to CMS -> Static Blocks and click the Add New Block button to initiate the creation of the CMS static block.
For the Social Links Box, we used the following settings:
| Option | Setting |
|---|---|
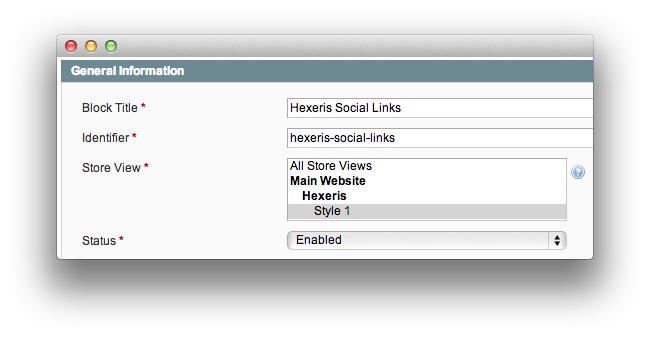
| Block Title | Hexeris Social Links |
| Identifier | hexeris_social_links |
| Store View | Style 1 |
| Status | Enabled |
To replicate the block as it appears in our demo, enter the following as the Content (disabling the WYSIWYG editor before pasting):
<div class="rt-social-buttons">
<span class="social-button icon-random"> </span> <span class=
"rt-social-text">Follow</span> <a class="social-button rt-facebook-btn"
href="http://www.facebook.com/RocketTheme"><span class=
"icon-facebook"> </span></a> <a class="social-button rt-twitter-btn"
href="https://twitter.com/rockettheme"><span class=
"icon-twitter"> </span></a> <a class="social-button rt-google-btn"
href="https://plus.google.com/114430407008695950828/posts"><span class=
"icon-google-plus"> </span></a> <a class="social-button rt-rss-btn"
href=
"http://www.rockettheme.com/blog?format=feed&type=rss"><span class="icon-rss">
</span></a>
<div class="clear">
</div>
</div>
Once this is done, select Save.
Next, you need to create a widget instance to add the block to the frontend.
To do this, go to CMS -> Widgets and click the Add New Widget Instance button.
Set the Type to CMS Static Block, select the hexeris / default package, and add the following settings:
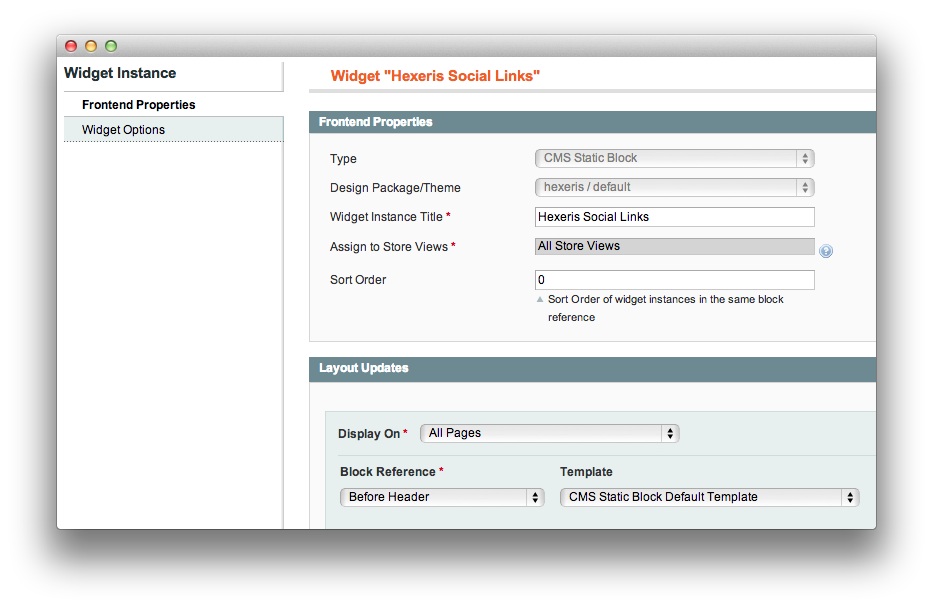
| Option | Setting |
|---|---|
| Widget Instance Title | Hexeris Social Links |
| Assign to Store Views | All Store Views |
| Sort Order | 0 |
| Display On | All Pages |
| Block Reference | Before Header |
| Template | CMS Static Block Default Template |
Then, choose your CMS block Hexeris Social Links under the Widget Options tab, and save.
The blocks should now appear on your frontend (remember to flush your Magento cache first).