Anacron: Recreating the Demo - Footer
Your Guide to Recreating Elements of the Anacron Theme for WordPress
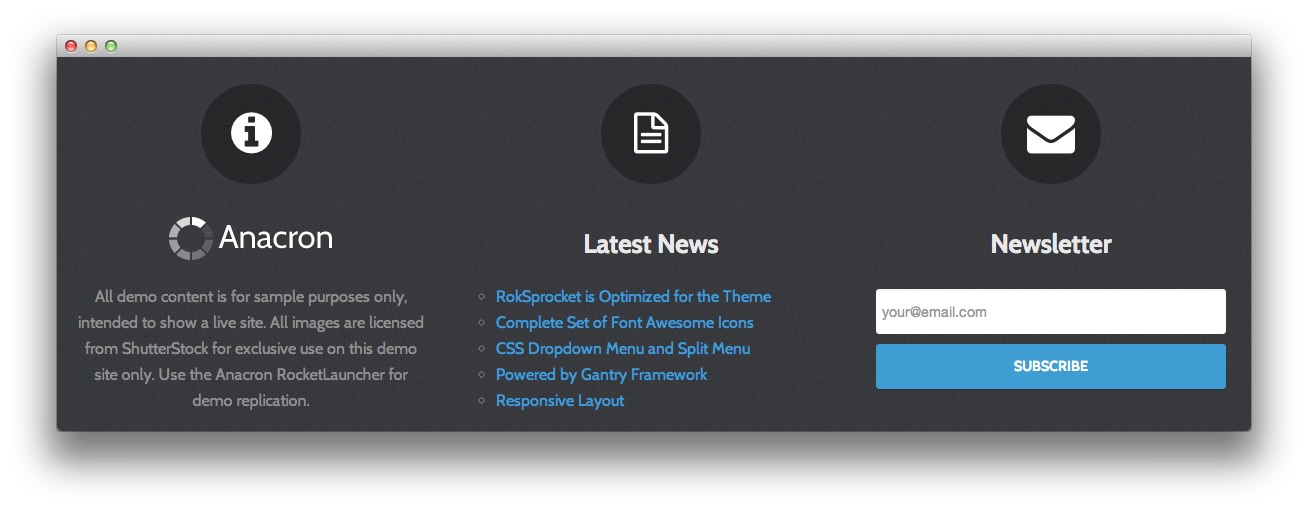
Footer Section
-
 1Text2Text3Text4Text5Text
Here is the widget breakdown for the Footer section:
- Text
- Gantry Divider
- Text
- Text
- Gantry Divider
- Text
- Text
Text 1
You will need to enter the following in the main text field.
<span class="rt-icon"><span class="icon-info-sign"></span></span>
<span class="rt-footer-logo"></span>
<p>All demo content is for sample purposes only, intended to show a live site. All images are licensed from ShutterStock for exclusive use on this demo site only. Use the Anacron RocketLauncher for demo replication.</p>
Here is a breakdown of options changes you will want to make to match the demo.
- Set the Align Variation option to RT-Center.
- Enter
fp-footer-ain the Custom Variations field. - Leaving everything else at its default setting, select Save.
Gantry Divider
This widget tells WordPress to start a new widget column beginning with the widget placed directly below the divider in the section.
Text 2
You will need to enter the following in the main text field.
<span class="rt-icon"><span class="icon-file-text-alt"></span></span>
Here is a breakdown of options changes you will want to make to match the demo.
- Set the Align Variation option to RT-Center.
- Enter
fp-footer-bin the Custom Variations field. - Leaving everything else at its default setting, select Save.
Text 3
You will need to enter the following in the main text field.
<ul class="latestnewsfp-latest-news rt-title-center">
<li>
        <a href="#">
            RokSprocket is Optimized for the Theme</a>
    </li>
    <li>
        <a href="#">
            Complete Set of Font Awesome Icons</a>
    </li>
    <li>
        <a href="#">
            CSS Dropdown Menu and Split Menu</a>
    </li>
    <li>
        <a href="#">
            Powered by Gantry Framework</a>
    </li>
    <li>
        <a href="#">
            Responsive Layout</a>
    </li>
</ul>
Here is a breakdown of options changes you will want to make to match the demo.
- Enter
Latest Newsin the Title field. - Enter
fp-latest-news rt-title-centerin the Custom Variations field. - Leaving everything else at its default setting, select Save.
Text 4
You will need to enter the following in the main text field.
<span class="rt-icon"><span class="icon-envelope"></span></span>
Here is a breakdown of options changes you will want to make to match the demo.
- Set the Align Variation option to RT-Center.
- Enter
fp-footer-cin the Custom Variations field. - Leaving everything else at its default setting, select Save.
Text 5
You will need to enter the following in the main text field.
<form onsubmit="window.open('http://feedburner.google.com/fb/a/mailverify?uri=rocketthemeblog', 'popupwindow', 'scrollbars=yes,width=550,height=520');return true" target="popupwindow" method="post" action="http://feedburner.google.com/fb/a/mailverify" class="fp-newsletter-form">
    <input type="text" name="email" class="inputbox" placeholder="your@email.com" />
    <input type="hidden" name="uri" value="rocketthemeblog" />
    <input type="hidden" value="en_US" name="loc" />
    <input type="submit" value="Subscribe" class="button" name="Submit" />
</form>
Here is a breakdown of options changes you will want to make to match the demo.
- Enter
Newsletterin the Title field. - Set the Align Variation option to RT-Center.
- Enter
fp-newsletter rt-title-centerin the Custom Variations field. - Leaving everything else at its default setting, select Save.