Oculus: Recreating the Demo - Footer
Your Guide to Recreating Elements of the Oculus Theme for WordPress
Footer Section
-
 1Text2Custom Menu3Text4Text
Here is the widget breakdown for the Footer section:
- Text
- Gantry Divider
- Custom Menu
- Gantry Divider
- Text
- Gantry Divider
- Text
Text
This section of the page is a standard text widget. You will need to enter the following in the main text field.
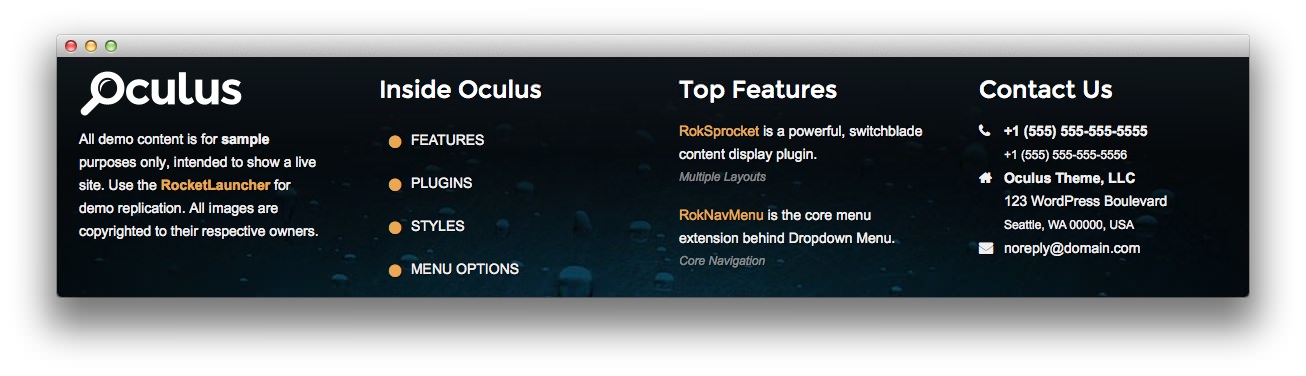
<div class="rt-footer-logo"></div>

<span>All demo content is for <strong>sample</strong> purposes only<span class="visible-large">, intended to show a live site</span>. <span class="hidden-tablet">Use the <a href="http://demo.rockettheme.com/wordpress-themes/wp_oculus/installation/"><strong>RocketLauncher</strong></a> for demo replication.</span> All images are copyrighted to their respective owners.</span>
Here is a breakdown of options changes you will want to make to match the demo.
- Leaving everything else at its default setting, select Save.
Gantry Divider
This widget tells WordPress to start a new widget column beginning with the widget placed directly below the divider in the section.
Custom Menu
The Custom Menu widget allows us to add an extra menu somewhere on the page. This menu was created separately from the main menu linked in the header, and can be configured by going to Administration -> Appearance -> Menus.
Here is a breakdown of what you will need to change in the widget options to match the demo.
- Set the Select Menu option to match the name of the menu you wish to appear in this area.
- Enter
Inside Oculusin the Title field. - Set the Custom Variations field to
fp-footer hidden-phone. - Leaving all other options at their default settings, click Save.
Text
This section of the page is a standard text widget. You will need to enter the following in the main text field.
<p class="nomarginbottom"><a href="http://demo.rockettheme.com/wordpress-themes/wp_oculus/plugins/">RokSprocket</a> is a powerful, switchblade content display plugin.</p>
<p class="rt-tag">Multiple Layouts</p>

<p class="nomarginbottom"><a href="http://demo.rockettheme.com/wordpress-themes/wp_oculus/plugins/">RokNavMenu</a> is the core menu extension behind Dropdown Menu.</p>
<p class="rt-tag">Core Navigation</p>
Here is a breakdown of options changes you will want to make to match the demo.
- Set the Title to
Top Features. - Enter
fp-footer hidden-phonein the Custom Variations field. - Leaving everything else at its default setting, select Save.
Text
This section of the page is a standard text widget. You will need to enter the following in the main text field.
<div class="gantry-width-10 gantry-width-block hidden-phone">
    <span class="icon-phone"></span>
</div>
<div class="gantry-width-90 gantry-width-block">
    <strong><span>+1 (555) 555-555-5555</span></strong><br />
    <small>+1 (555) 555-555-5556</small>
</div>

<div class="gantry-width-10 gantry-width-block hidden-phone">
    <span class="icon-home"></span>
</div>
<div class="gantry-width-90 gantry-width-block">
    <strong><span>Oculus Theme, LLC</span></strong><br />
    <span>123 WordPress Boulevard</span><br />
    <small>Seattle, WA 00000, USA</small>
</div>

<div class="gantry-width-10 gantry-width-block hidden-phone">
    <span class="icon-envelope-alt"></span>
</div>
<div class="gantry-width-90 gantry-width-block">
    <span>noreply/@domain.com</span>
</div>
Here is a breakdown of options changes you will want to make to match the demo.
- Set the Title to
Contact Us. - Enter
fp-footer hidden-phonein the Custom Variations field. - Leaving everything else at its default setting, select Save.