RokQuickCart - Setup Guide
Your Guide to Using RokQuickCart for Joomla
Introduction
RokQuickCart is a very simple Joomla extension, which works with SimpleCart, that is designed to make it easy to add a cart to your site. As with any e-commerce tool, there are some important considerations to make prior to taking this component live. We have added the ability to set RokQuickCart up in a sandbox mode so you can test it prior to having transactions appear on your Google or PayPal account. We have also explained some of the important taxing and shipping considerations below.
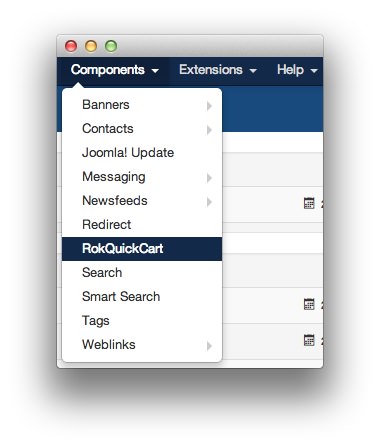
There are two primary areas of interest when setting up the RokQuickCart component. The first area is the RokQuickCart Configuration page which is accessible by navigating to Admin -> System -> Global Configuration -> RokQuickCart. You can also visit it by selecting Options within the RokQuickCart Items Manager which is directly accessible by navigating to Admin -> Components -> RokQuickCart. These two pages give you the ability to configure your store on the backend.
RokQuickCart also provides a great deal of configuration options on the backend that allow you to select a checkout method, currency type, add product size and color variations, manage taxes, and more.
Checkout Methods
RokQuickCart supports PayPal, Google Checkout, Amazon, and custom SendForms as checkout methods.
PayPal
If you wish to use PayPal as a checkout provider you must set up a business PayPal account (at http://www.paypal.com) and provide that business PayPal email to RokQuickCart.
Taxes with Paypal
When using PayPal as a checkout provider, you can add taxes into the RokQuickCart display. These will be passed on to PayPal. The Tax Rate is based on a single unit of currency (1.00). So if you want to do a 10% tax rate, you would set the tax rate field in the configuration to 0.10.
Shipping amounts with PayPal.
Shipping amounts with PayPal are totaled by the cart and passed to PayPal as a line item in the cart. There are four different types of shipping calculation methods:
Per Item Shipping: Shipping cost is based on the shipping cost per item. If you use a different method, make sure each cart items shipping amount is set to 0. Flat Rate: One set shipping price for the whole order.
Quantity Rate: Shipping cost per item no matter what item it is. Percentage of Total: Shipping cost is calculated as a percent of total sales. The Shipping will be added as a line item
Google Checkout
If you want to use Google Checkout as your cart processor, please follow the instructions on signing up with Google Checkout.
At this point, RokQuickCart uses the Google Checkout HTML API. So be sure to turn OFF the "Shopping cart post security" as talked about on the Signup Page. This must be turned off for both the Sandbox and Production Google Checkout accounts in order for your cart to be processed.
Taxes and Shipping with Google Checkout
Taxes and Shipping for Google Checkout are handled in the Google Checkout Setup. It is based on your location and the location of the purchaser. You can customize your tax rates and shipping based on multiple rules that you define. Therefore only the tax rate is passed to Google Checkout from RokQuickCart. Google Checkout will only add the taxes and shipping in if you define it to do so in the setup.
NOTE: Google Checkout has been retired by Google and may no longer be available.
Amazon Payments Checkout
Amazon Payments is one of the dealing platforms by which e-commerce sites are accepting payments. Money received through Amazon Payments Checkout is held by Amazon until confirmation of shipment occurs. This method allows the customers that already have an account with Amazon to use it to make their purchase without having to give their information to another third-party.
You can set up an account with Amazon Payments through its official website.
Checkout Modes
RokQuickCart provides both Production and Sandbox modes to allow you to easily test your cart and then switch it to production.
SandBox Mode
Sandbox mode allows you to test the cart against the PayPal and Google Checkout Sandboxes. Using the sandbox, you can test the carts against the checkout provider and make sure they are working for your needs. When in sandbox mode no real orders will be taken, and no real charges will be applied.
You can create accounts for the PayPal sandbox. Please see the PayPal developers information on how to setup and use the paypal sandbox. You can also see the page on working with Google Checkout on a Development Site in order to get more information on using the Google Checkout Sandbox.
Amazon also has a useful guide outlining its sandbox protocol.
Production Mode
Production mode will make your cart live. You can take orders and charges. It hits the main PayPal and Google Checkout sites.
When switching to Production Mode, make sure you set your Merchant ID or PayPal email to your production accounts.
Items Manager
The Items Manager is the primary hub for creating and modifying products that appear through RokQuickCart. This is where you create, delete, and edit products that you want to make available for sale on your site. From the main Items Manager page, you are able to quickly enable and disable existing products, delete products you no longer carry, access the main RokQuickCart configuration page, edit existing products, and start the process of adding new products.
Main Page
-
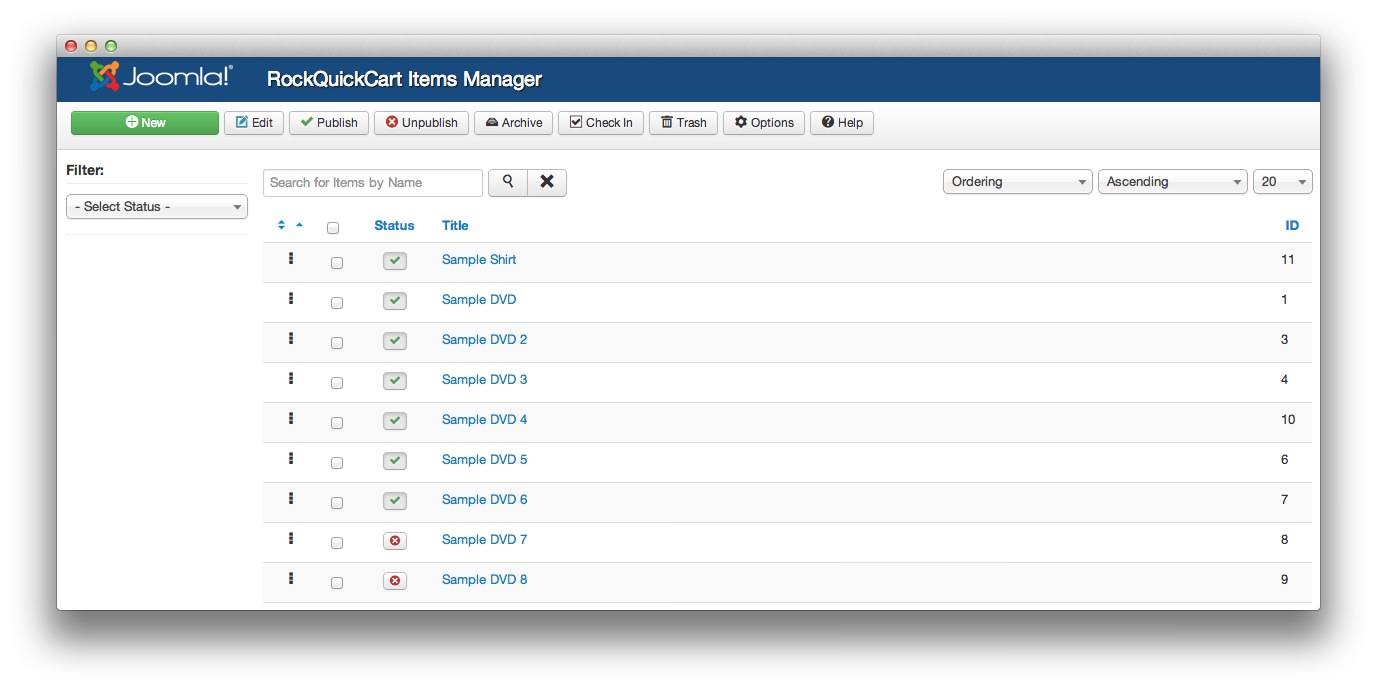 1NewThis button initiates the new product process.2Publish and UnpublishThese buttons give you the ability to quickly publish or unpublish selected products. Alternatively, you can click the green checkmark or red x next to the product title to toggle its state.3ArchiveThis button enables you to archive an item so it no longer appears in the primary list, but can be restored at a later date.4Check InThis option checks in a product so it can be edited. This is only necessary when someone has left a product editing session without properly closing the page.5TrashThis button will delete selected items.6OptionsYou can access the primary RokQuickCart configuration page by clicking this button.7TitleClicking a product title will take you directly to its Edit page where you can adjust its individual settings.
New: This button initiates the new product process.
Publish and Unpublish: These buttons give you the ability to quickly publish or unpublish selected products. Alternatively, you can click the green checkmark or red x next to the product title to toggle its state.
Archive: This button enables you to archive an item so it no longer appears in the primary list, but can be restored at a later date.
Check In: This option checks in a product so it can be edited. This is only necessary when someone has left a product editing session without properly closing the page.
Trash: This button will delete selected items.
Options: You can access the primary RokQuickCart configuration page by clicking this button.
Title: Clicking a product title will take you directly to its Edit page where you can adjust its individual settings.
Item Editor
-
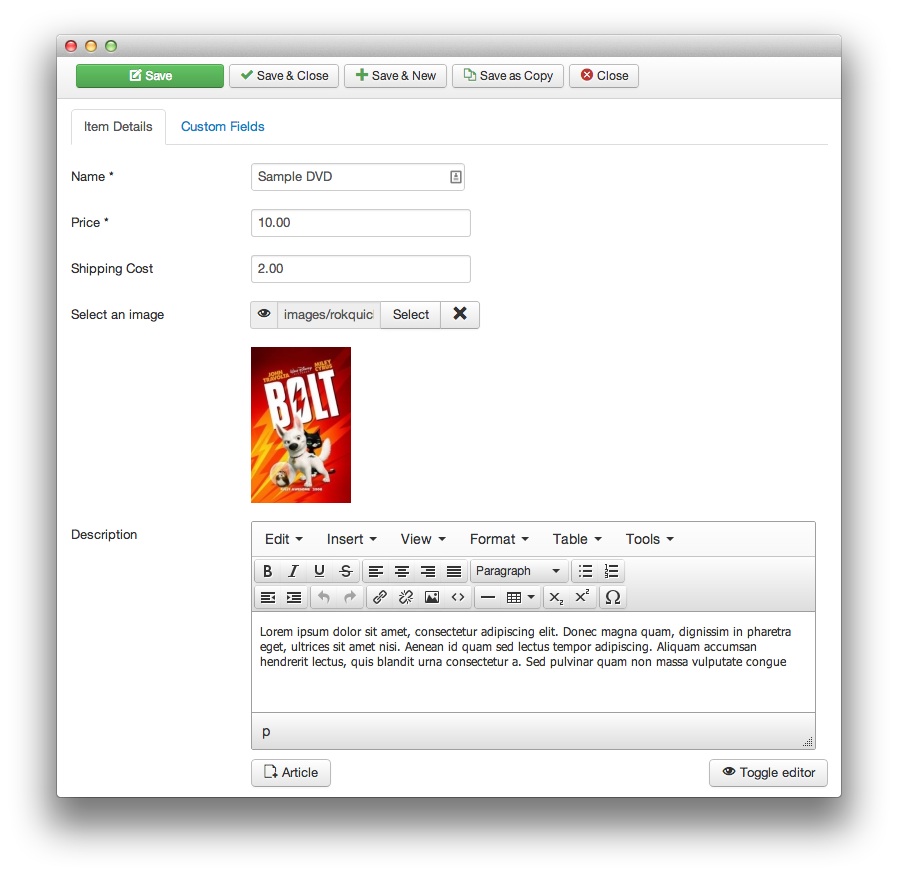 1NameThis is the name of your product that will be displayed on the products page.2PriceThis price (in the currency you have selected on the main configuration page) is for the product itself and does not include shipping.3Shipping CostThis is where you can add the shipping costs for the product that sit apart from the main product price.4Select an ImageYou can upload a full-size image of your product here. RokQuickCart will automatically create smaller image sizes for your site.5DescriptionThis is the description you wish to have appear with the product on your site.
Name: This is the name of your product that will be displayed on the products page.
Price: This price (in the currency you have selected on the main configuration page) is for the product itself and does not include shipping.
Shipping Cost: This is where you can add the shipping costs for the product that sit apart from the main product price
Select an Image: You can upload a full-size image of your product here. RokQuickCart will automatically create smaller image sizes for your site
Description: This is the description you wish to have appear with the product on your site. The editor is based on RocketTheme's powerful RokPad extension, allowing you much more control over how content appears on your site.
-
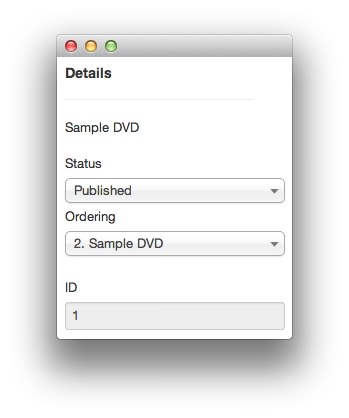 1StatusYou can set the status of the individual product here. An unpublished product will not appear in your active product catalog.2OrderingYour product ordering is set here.
Status: You can set the status of the individual product here. An unpublished product will not appear in your active product catalog.
Ordering: Your product ordering is set here.
-
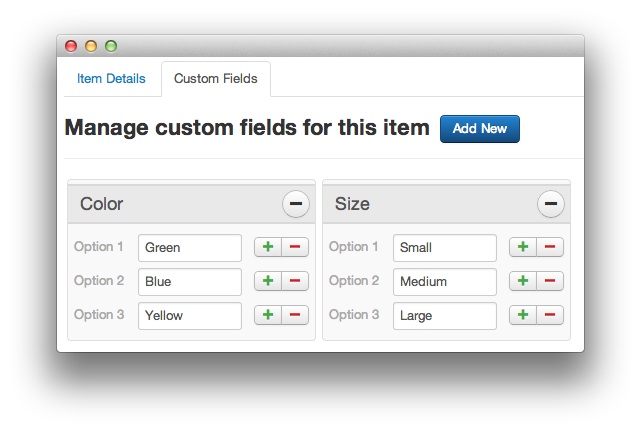 1Add NewThis button makes it easy to add variables to your products. If you have a product with varying details, you can add them here to avoid having to create a new item for each option.2Add and RemoveYou can use the + and - buttons to add and remove options for users. These options appear as a drop-down on the frontend giving customers the ability to select these options prior to purchase.
Add New: This button makes it easy to add variables to your products. If you have a product with varying details, you can add them here to avoid having to create a new item for each option.
Add and Remove: You can use the + and - buttons to add and remove options for users. These options appear as a drop-down on the frontend giving customers the ability to select these options prior to purchase.
Setup and Configuration
The main RokQuickCart Configuration page can be accessed by navigating to Admin -> System -> Global Configuration -> RokQuickCart or simply selecting Options in the RokQuickCart Items Manager. It serves as the primary configuration page to determine how RokQuickCart appears and functions.
-
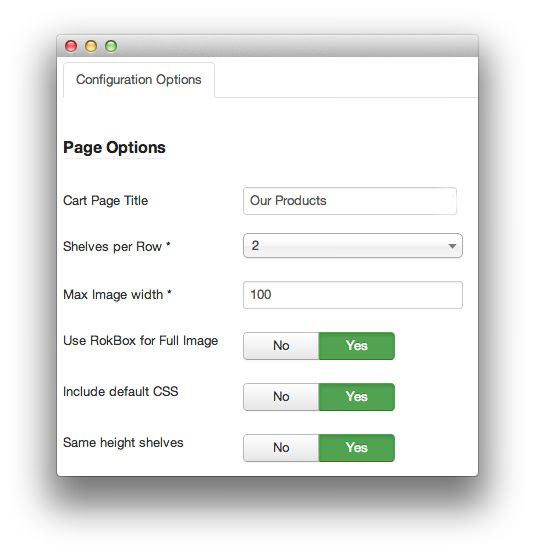 1Cart Page TitleThis is the title for the primary cart page that appears on the frontend of your site.2Shelves Per RowThis is the amount of shelves you wish to have appear side-by-side in each row on the frontend.3Max Image WidthThis is the number of pixels in width images will max out at in your cart display.4Use RokBox for Full ImageToggles the ability of the visitor to pull up a full-size copy of the product image for closer inspection.5Include Default CSSShows the default cart CSS. Set to No if you want to override the default template CSS with your own.6Same Height ShelvesEnables you to set whether or not you want the height product shelves to appear at the same height (based on the tallest one).
Cart Page Title: This is the title for the primary cart page that appears on the frontend of your site.
Shelves Per Row: This is the amount of shelves you wish to have appear side-by-side in each row on the frontend.
Max Image Width: This is the number of pixels in width images will max out at in your cart display.
Use RokBox for Full Image: Toggles the ability of the visitor to pull up a full-size copy of the product image for closer inspection.
Include Default CSS Shows the default cart CSS. Set to No if you want to override the default template CSS with your own.
Same Height Shelves Enables you to set whether or not you want the height product shelves to appear at the same height (based on the tallest one).
-
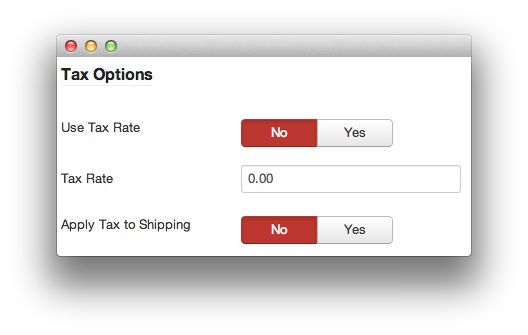 1Use Tax RateToggles whether or not you wish to use the tax rate when determining the final cost of the cart.2Tax RateTax Rate The tax rate to use. This is based on a single unit of currency (1.00). For a 10% tax rate, you will enter 0.10.3Apply Tax to ShippingEnables you to apply tax to the shipping total.
Use Tax Rate: Toggles whether or not you wish to use the tax rate when determining the final cost of the cart.
Tax Rate: The tax rate to use. This is based on a single unit of currency (1.00). For a 10% tax rate, you will enter 0.10.
Apply Tax to Shipping: Enables you to apply tax to the shipping total.
-
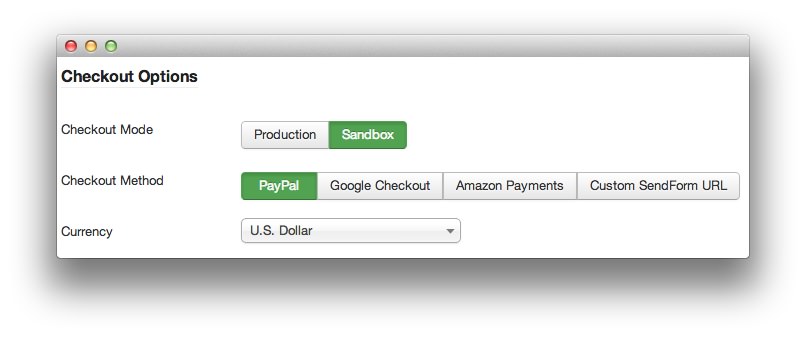 1Checkout ModeThis option toggles between the Production and Sandbox checkout modes (see above).2Checkout MethodToggles between PayPal, Google Checkout, Amazon Payments, and a Custom SendForm URL as your primary checkout service.3CurrencySelect the currency your products are priced with. This is likely the dominant currency in your region.
Checkout Mode: This option toggles between the Production and Sandbox checkout modes (see above).
Checkout Method: Toggles between PayPal, Google Checkout, Amazon Payments, and a Custom SendForm URL as your primary checkout service.
Currency: Select the currency your products are priced with. This is likely the dominant currency in your region.
-
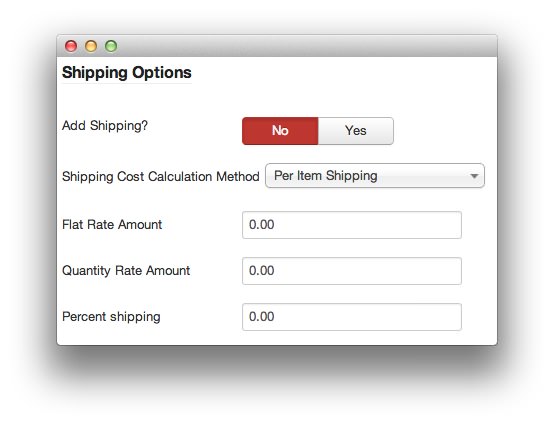 1Add ShippingToggles the addition of shipping costs to the total cart cost. Select No for free shipping.2Shipping Cost Calculation MethodThis toggles the method by which shipping costs are calculated. You can choose between Flat Rate, Quantity Rate, Percentage of Total, and Per-Item Shipping.3Flat Rate AmountIf a Flat Rate shipping cost method is used, this is the flat rate for shipping that will be added to order totals.4Quantity Rate AmountIf a Quantity Rate shipping cost is used, this is the per-item shipping cost that will be added to order totals.5Percent ShippingIf the Percent Shipping cost is used, this will be the percentage of the cart total added to cover shipping.
Add Shipping: Toggles the addition of shipping costs to the total cart cost. Select No for free shipping.
Shipping Cost Calculation Method: This toggles the method by which shipping costs are calculated. You can choose between Flat Rate, Quantity Rate, Percentage of Total, and Per-Item Shipping.
Flat Rate Amount: If a Flat Rate shipping cost method is used, this is the flat rate for shipping that will be added to order totals.
Quantity Rate Amount: If a Quantity Rate shipping cost is used, this is the per-item shipping cost that will be added to order totals.
Percent Shipping: If the Percent Shipping cost is used, this will be the percentage of the cart total added to cover shipping.
-
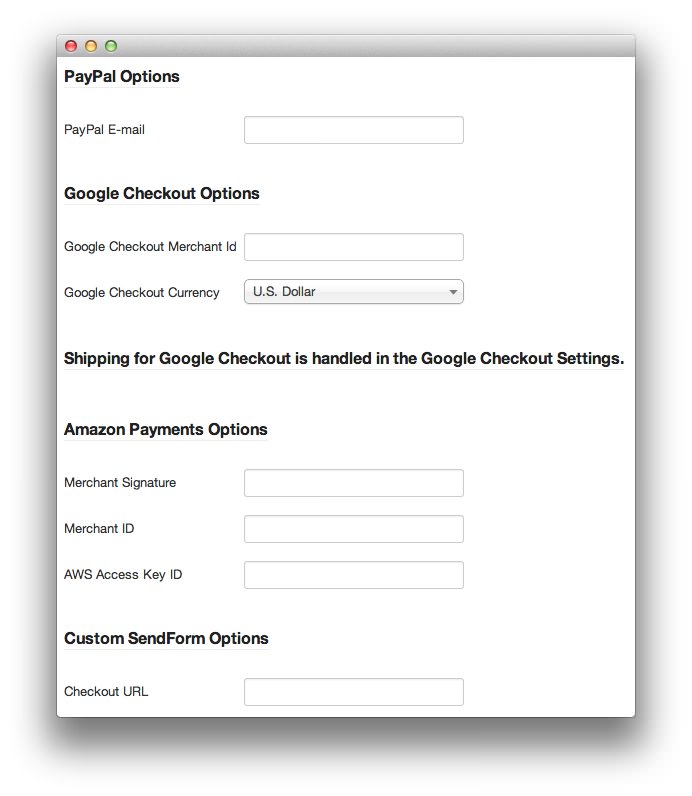 1PayPal E-mailThis is the email account associated with your PayPal account. Payments made will go through this account.2Google Checkout Merchant IDThis is the Merchant ID used for Google Checkout.3Google Checkout CurrencyThis is the currency you wish to accept through Google Checkout.4Merchant SignatureThis is the merchant signature used for Amazon Payments Checkout.5Merchant IDYour Amazon Merchant ID.6AWS Access Key IDYour AWS Access Key ID used for Amazon Payments Checkout.7Checkout URLThe URL leading to your Custom SendForm checkout.
PayPal E-mail: This is the email account associated with your PayPal account. Payments made will go through this account.
Google Checkout Merchant ID: This is the Merchant ID used for Google Checkout.
Google Checkout Currency: This is the currency you wish to accept through Google Checkout.
Merchant Signature: This is the merchant signature used for Amazon Payments Checkout.
Merchant ID: Your Amazon Merchant ID.
AWS Access Key ID: Your AWS Access Key ID used for Amazon Payments Checkout.
Checkout URL: The URL leading to your Custom SendForm checkout.