How to Work with Cache in Magento
Disabling the caching feature in Magento is a great first step during initial setup.
Introduction
Magento uses cache in many different ways, so you will notice several various caching features that you can enable or disable. If you are working on customizing your site and getting it set up, it is best to disable all the cache settings. This allows you to work and check your site routinely without having to wait for cache to catch up with any changes you have made.
-
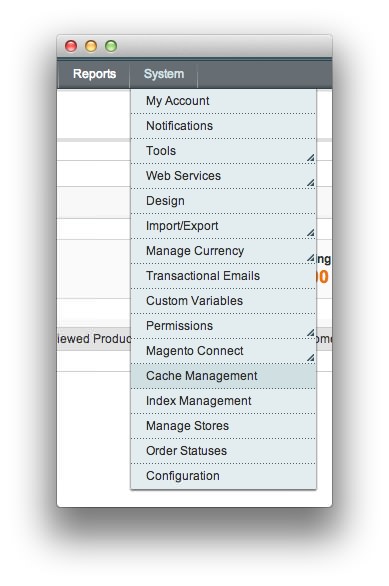
 1Cache ManagementThis menu option brings you to Magento's primate Cache Management menu.
You can access the primary cache controls by navigating to System -> Cache Management.
Enabling, Disabling, and Refreshing the Cache
-
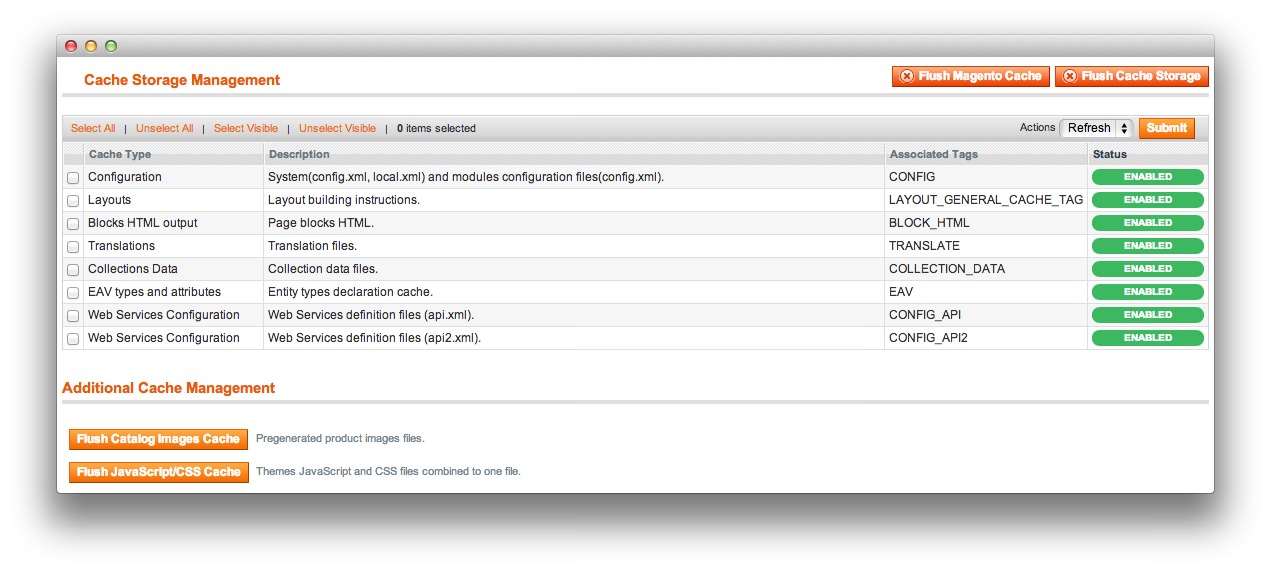
 1Flush Magento CacheThis option flushes the main cache items for page display purposes.2Flush Cache StorageThis option is a more complete cache flush that includes items in Magento's cache directory.3Flush Catalog Images CacheRefreshes cache related to catalog images.4Flush Javascript/CSS CacheDeals with page styling cache.
There are four big buttons located above and below the itemized list in the main Cache Management menu. It is recommended that you work with the individual line items listed as a first step in troubleshooting before hitting the larger buttons (detailed below).
If you want to disable your site's cache entirely, simply check all of the boxes listed to the left of this itemized menu and select Disable in the Actions dropdown. You can repeat the same process to enable the cache by selecting Enable, instead.
The Refresh option flushes the cache for all of these components while the larger Flush Magento Cache button may not actually fully flush all aspects of Magento's cache. If you are troubleshooting an issue, we recommend doing the line-item refresh prior to hitting the Flush Magento Cache and Flush Cache Storage buttons.
Flush Magento Cache
This button deals with the main cache items for page display purposes. It can safely be used if you want to refresh your page.
Flush Cache Storage
This option is a more complete cache flush and includes more items in Magento's cache directory.
Flush Catalog Images Cache
The Flush Catalog Images Cache option is just what it says. It deals with the catalog images. If you are changing images on products, and not seeing the new images on your site, you can try flushing this and refreshing your page.
Flush Javascript/CSS Cache
This option involves a lot of the page styling cache and can be flushed when you are making updates. It is not needed regularly, but it is best to do if you want to see any recent changes.
Flat Catalog Data
-
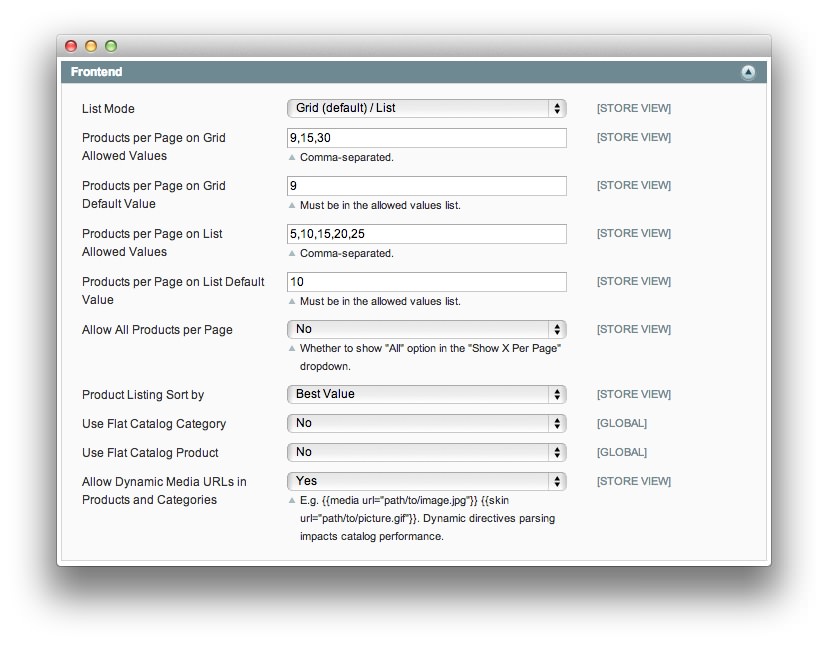
 1Use Flat Catalog CategoryAllows you to use flat catalog categories to lessen server load and improve page load time.2Use Flat Catalog ProductEnables the use of flat product data feature in order to reduce load time.
Magento makes many calls to the database to retrieve information for each page viewed. This can take some time, using server resources which may differ from the part of the server that handles your database, as opposed to your files.
If there are several bits of information that Magento needs to display a Category page, the Flat Catalog Data will compile all of these bits for that page into a single database table entry. This way, Magento can make one call to the database to retrieve the necessary information. This is beneficial, but does not work in all instances. This should be tested after it is turned on.
To find these settings, you will need to navigate to System -> Configuration, click Catalog in the sidebar, and manipulate the Frontend settings.
Flat Product Data
This is similar to the Flat Catalog Data feature in that it will compile all the information Magento needs to display a page into one database table entry, only this option does so for Product View pages.
The product view contains a great deal of information including displaying your product attributes, so this can be beneficial in page load time. Test several pages after turning this feature on to make sure there are no issues.
This setting is located in the same Frontend menu as the Flat Catalog Data listed above.
Merge CSS

Magento requires many CSS files to display a site's theme and style. These files can be merged using this feature, saving time and weight on page load. This process takes multiple CSS files used by your site and compiles them into a single file.
After turning this feature on, be sure to test several pages and try different browsers. Also, visit your cache settings and Clear JavaScript and CSS cache. This is a good feature to turn on after you have completed customizing your site.
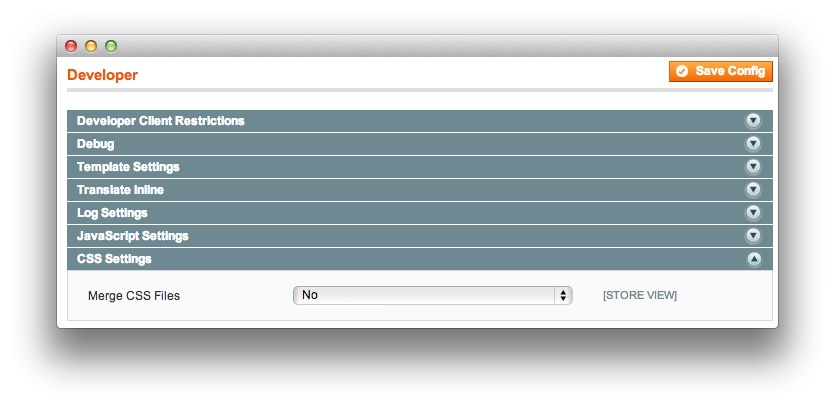
You can find this feature by navigating to Admin Panel -> System -> Configuration and selecting Developer near the bottom of the sidebar on the left. You will find the CSS Settings menu on the resulting page.
Merge JS
System -> Configuration -> Developer -> JavaScript Settings -> Merge JavaScript Files
Magento uses quite a bit of code to make all of its features work. Under the hood, it is a cluttered machine packed with cogs turning against each other to deliver your content to visitors.
This can lead to your website needing to pull in many separate JavaScript files so the page can load. Merging these files can save a good amount of time and weight on page load. This is a good feature to turn on once you are finished customizing your site and theme.
After turning this on, be sure to do testing on different browsers and go through different pages and features on your site. Depending on the scripts you are using, this may or may not cause issues.
You can find this option in the same page as the Merge CSS option listed above. Simply navigate to Admin Panel -> System -> Configuration and select Developer from the sidebar to the left. Once there, click on the JavaScript Settings section.