RokGallery: Editing and Managing Image Files
Your Guide to Working with Images Using RokGallery for WordPress
Image Editing in RokGallery
RokGallery is not a full-fledged image editing solution, but it can be used to crop and resize images so that they fit within your site's layout. Because RokGallery preserves the original image, these edits are saved separately and referred to as slices. A single image in RokGallery can have as many slices as you need to fit various RokGallery widgets placed in your site. These slices can be created by the RokGallery Image Editor and further refined using the Slice Editor.
RokGallery Image Editor
The RokGallery Image Editor is available to you from within the RokGallery component administration interface found in Admin -> RokGallery Admin. By clicking on an image's edit icon (1), a panel appears which gives you direct access to the image's title, slug (URL-friendly title), description, tags, and its slices.
-
 1Edit IconGrants access to an image's editing panel.2TitleThis field allows you to adjust the image's title as needed.3SlugThis field is for the url-friendly slug for the image, replacing spaces with dashes. This field is automatically generated by RokGallery, however you can change it as needed.4DescriptionYou would enter the description of an image here.5TagsYou can add and remove tags to the particular image in this area.6SlicesThis area of the Image Editor is where you can access the Slice Editor to create new slices, edit existing ones, generate a sharable link to a slice, or delete the slice. The Admin Thumbnail is a default slice used on the administrative side of RokGallery to display the image on the backend and can not be deleted.
Edit Icon: Grants access to an image's editing panel.
Title: This field allows you to adjust the image's title as needed.
Slug: This field is for the url-friendly slug for the image, replacing spaces with dashes. This field is automatically generated by RokGallery, however you can change it as needed.
Description: You would enter the description of an image here.
Tags: You can add and remove tags to the particular image in this area.
Slices: This area of the Image Editor is where you can access the Slice Editor to create new slices, edit existing ones, generate a sharable link to a slice, or delete the slice. The Admin Thumbnail is a default slice used on the administrative side of RokGallery to display the image on the backend and can not be deleted.
RokGallery Slice Editor
Administrative Slices
-
 1Admin Slice IndicatorA red bookmark in the upper-left area of the Slice Editor indicates that the selected slice is used for administrator purposes only, and can not be deleted.
- Admin Slice Indicator A red bookmark in the upper-left area of the Slice Editor indicates that the selected slice is used for administrator purposes only, and can not be modified or deleted.
Regular Slices
-
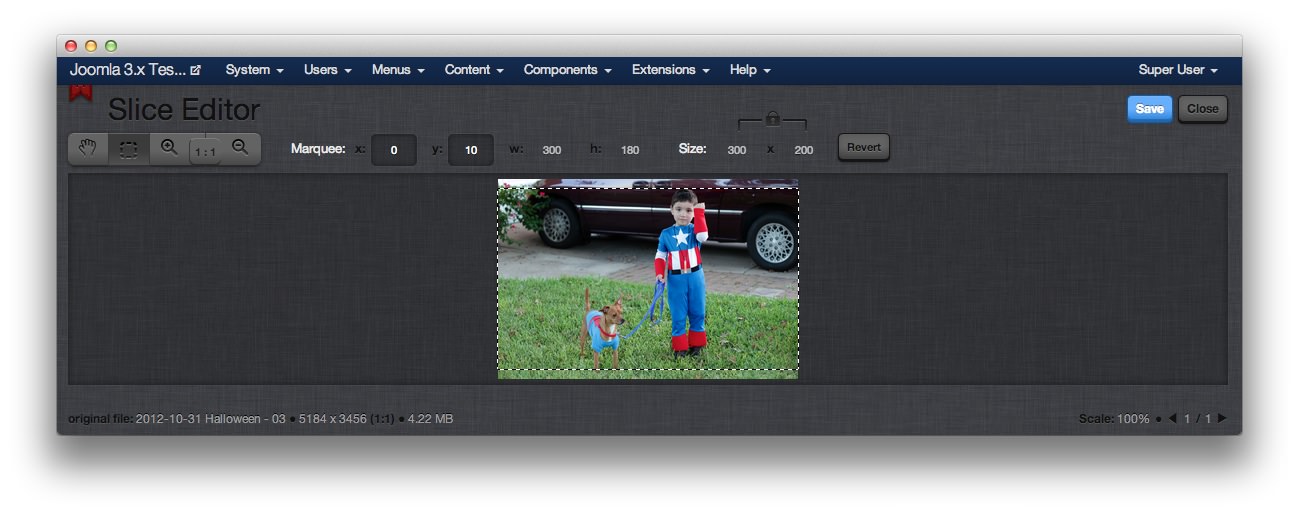
 1GripThis tool allows you to grab and move a zoomed-in image around in the editor.2SelectThis tool gives you the option to select a specific are within the image to crop for the slice.3Zoom ControlsThese controls allow you to zoom in, zoom out, and view the image in the original size.4MarqueeThis control gives you the current position of the selection area, as well as the ability to set a specific location.5Width and HeightThis option allows you to set a specific width and height for the selection area. This option is disabled on administrative slices. Once applied, the selected area is cropped to become the new or edited slice.6SizeThe size settings allows you to do a simple resize of the image. You can adjust these settings even when there is a lock icon over the numbers, but changes will only be completed upon hitting the Apply button. This is not an option on administrative slices.7Revert and ApplyThese buttons allow you to revert all settings to the original image, or apply any changes made. You still need to hit Save (10) before closing the slice to save all changes, though.8Title, Slug, Link, Caption, and TagsThese options allow you to change the title, slug, link (where clicking the image takes the visitor), caption, and the slice's tags independent of the defaults set in the Image Editor.9ThumbnailThis option sets the thumbnail size for the slice as it would appear in any gallery displays that require a thumbnail. Additionally, these settings are used on the administrative end to display the slice in the Image Editor.10Save, Publish, Gallery, and CloseThese options allow you to save the slice as it has been edited in the Slice Editor, as well as publish the slice, assign a gallery (tags), and close the Slice Editor. If you wish to exit the Slice Editor without saving anything you have done, just hit Close.
Grip: This tool allows you to grab and move a zoomed-in image around in the editor.
Select: This tool gives you the option to select a specific are within the image to crop for the slice.
Zoom Controls: These controls allow you to zoom in, zoom out, and view the image in the original size.
Marquee: This control gives you the current position of the selection area, as well as the ability to set a specific location.
Width and Height: This option allows you to set a specific width and height for the selection area. This option is disabled on administrative slices. Once applied, the selected area is cropped to become the new or edited slice.
Size: The size settings allows you to do a simple resize of the image. You can adjust these settings even when there is a lock icon over the numbers, but changes will only be completed upon hitting the Apply button. This is not an option on administrative slices.
Revert and Apply: These buttons allow you to revert all settings to the original image, or apply any changes made. You still need to hit Save (10) before closing the slice to save all changes, though.
Title, Slug, Link, Caption, and Tags: These options allow you to change the title, slug, link (where clicking the image takes the visitor), caption, and the slice's tags independent of the defaults set in the Image Editor.
Thumbnail: This option sets the thumbnail size for the slice as it would appear in any gallery displays that require a thumbnail. Additionally, these settings are used on the administrative end to display the slice in the Image Editor.
Save, Publish, Gallery, and Close: These options allow you to save the slice as it has been edited in the Slice Editor, as well as publish the slice, assign a gallery (tags), and close the Slice Editor. If you wish to exit the Slice Editor without saving anything you have done, just hit Close.
The Slice Editor gives you the ability to edit (or create) individual slices used in various gallery widgets and pages of your site. These slices are independent copies of the original images, and as such, any changes you make in the Slice Editor only affect the individual slice.