Myriad: FAQ
Your Guide to Using the Myriad Theme for WordPress
Where can I find theme settings
- Log in to the WordPress administrative dashboard at http://www.yoursite.com/wp-admin/
- Select the Myriad Settings sidebar tab on the left of the dashboard.
- For more information visit our Gantry documentation on the settings menu.
How to Change the Logo as it Appears in the Main Menu
The Myriad theme features a text logo, with some accents (such as the white underlined) defined in CSS. You can make changes to this to meet your individual needs.
Step 1: Create a New Logo File
The first thing you will want to do is create a logo.png file featuring your new logo. The png file type enables you to maintain transparency and preserve quality. Our current text logo consumes 132px by 24px of space, so when creating your logo image, keep this in mind.
Once you've created your logo.png (keep it a PNG so you can retain transparency to not hide the background) upload it to your WORDPRESS_ROOT/wp-content/themes/rt_myriad_wp/images/logo folder. There will likely be a file there already featuring the default Myriad logo. Just replace this file with your own.
Step 2: Create a CSS File
Next, you will want to add the following to a file you create in WORDPRESS_ROOT/wp-content/themes/rt_myriad_wp/css/ called rt_myriad_wp-custom.css.
/* non-destructive removal of text logo */
li.rt-menu-logo > a > span {
    opacity: 0;
    height: 0;
}

/* addition of background image logo */
.menu-block .gf-menu .rt-menu-logo {
    background: url(../images/logo/logo.png);
    background-repeat: no-repeat;
    background-position: left center;
    width: 148px;
    height: 60px;
}

/* Adjust menu-logo underline position */
.menu-block .gf-menu .rt-menu-logo:after {
    bottom: 0px !important;
}
/* If needed use this Code Block to increase <a> area to match logo size*/
.menu-block .gf-menu .rt-menu-logo .item {
    padding-right: 180px !important;
}
/* Remove the meno-logo white underline */
/**** to use remove this comment line
.menu-block .gf-menu .rt-menu-logo:after {
    background: transparent !important;
}
**** to use remove this comment line /
You can adjust the width, height, bottom, and padding-right settings to meet your logo's needs. Some trial and error may be necessary to find the perfect settings for your site.
Step 3: Check Your Menu Settings
NOTE: Step 3 of this tutorial may already be completed if you are using the RocketLauncher. It is still good practice to check these files to ensure that the proper settings are in place.
The next step involved visiting the Menu Manager in your WordPress Admin and locating the Myriad menu item in the Main Menu. The Menu Item Type should be listed as a Menu Item Alias. The settings should appear as pictured below:
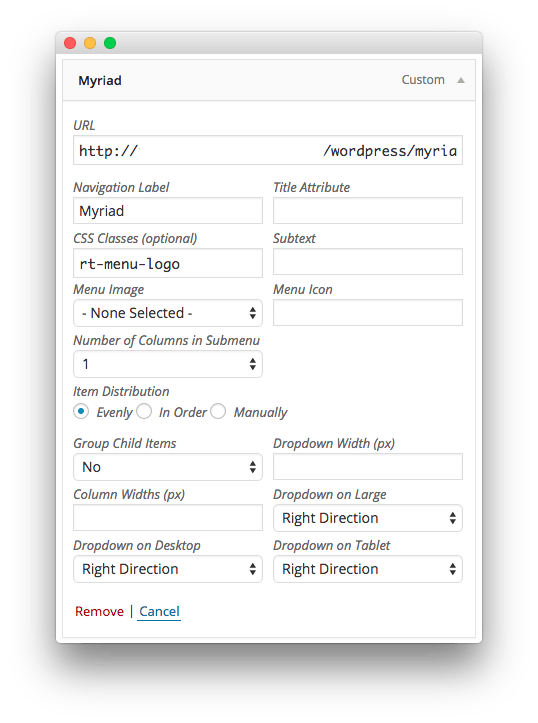
NOTE: If you do not see the CSS Classes field, you will need to turn it on using the Screen Options menu located near the upper-right corner of the Edit Menus page.
Optional: Remove that White Line
The white line can be removed by deleting the comment lines from the CSS file we created earlier. These are lines 25 and 29 in the example listed in Step 2.