Antares: Recreating the Demo - Pricing Page
Your Guide to Recreating Elements of the Antares Demo for Joomla
Introduction
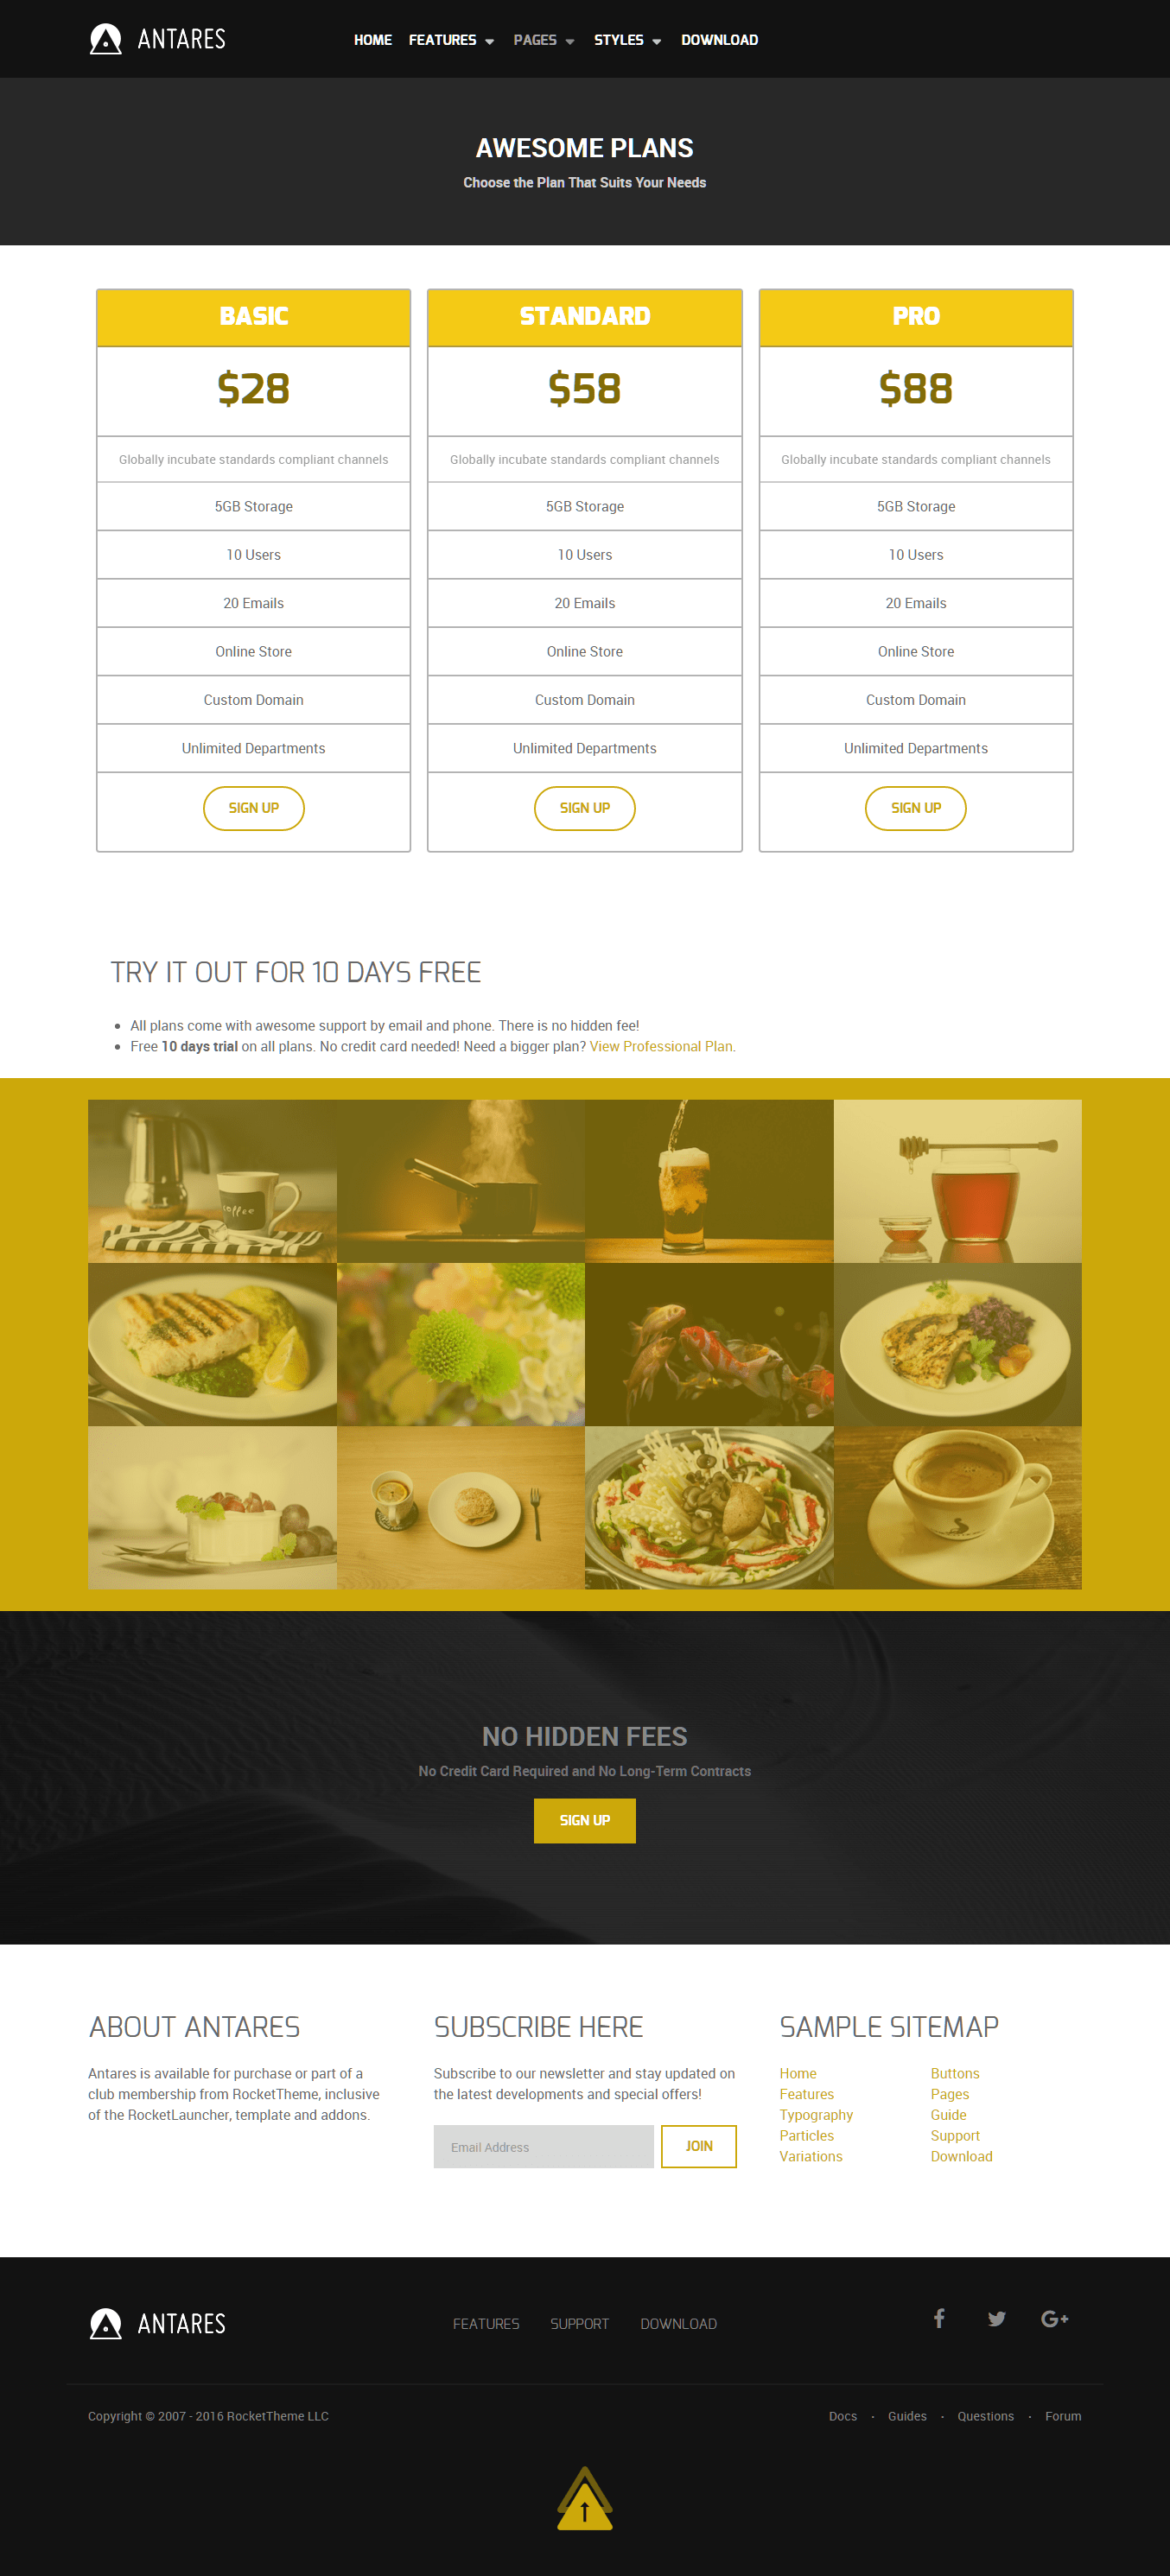
The Pricing example page demonstrates how you can create a beautiful page with the Antares template. Here is some information to help you replicate this page as it appears in the demo.
Modules and Particles
Below is a brief rundown of the modules and particles used to make up the demo page.
-
 1Header - Info List (particle)2Above - Custom HTML (module)3Mainbar - Page Content4Expanded - Image Grid (particle)5Extension - Info List (particle)6Bottom - Custom HTML (Module)7Bottom - Newsletter (Particle)8Bottom - Custom HTML (Module)
Header Section

This area of the page is an Info List particle. You will find the settings used in our demo below.
Info List Particle
Gantry 5 Particle Module Details
| Field | Setting |
|---|---|
| Title | Pricing - Header |
| Show Title | Hide |
| Position | header-a |
| Status | Published |
Particle Settings
| Option | Setting |
|---|---|
| CSS Classes |
center, g-layercontent, noborder
|
| Title | Blank |
| Intro | Blank |
| Grid Column | 1 Column |
| Info Lists Item 1 Name | Awesome Plans |
| Info Lists Item 1 Image | Blank |
| Info Lists Item 1 Image Location | Left |
| Info Lists Item 1 Text Style | Header |
| Info Lists Item 1 Image Style | Compact |
| Info Lists Item 1 Description | Choose the Plan That Suits Your Needs |
| Info Lists Item 1 Tag | Blank |
| Info Lists Item 1 Sub Tag | Blank |
| Info Lists Item 1 Label | Blank |
| Info Lists Item 1 Link | Blank |
| Info Lists Item 1 Icon | Blank |
| Info Lists Item 1 Read More Classes | Blank |
Above Section

This area of the page is a Custom HTML module. You will find the settings used in our demo below.
Any mod_custom (Custom HTML) modules are best handled using either RokPad or no editor as a WYSIWYG editor can cause issues with any code that exists in the Custom Output field.
Custom HTML (Module)
Details
| Field | Setting |
|---|---|
| Title | Pricing Table |
| Show Title | Hide |
| Position | above-a |
| Status | Published |
Custom Output
Enter the following in the Custom Output text editor.
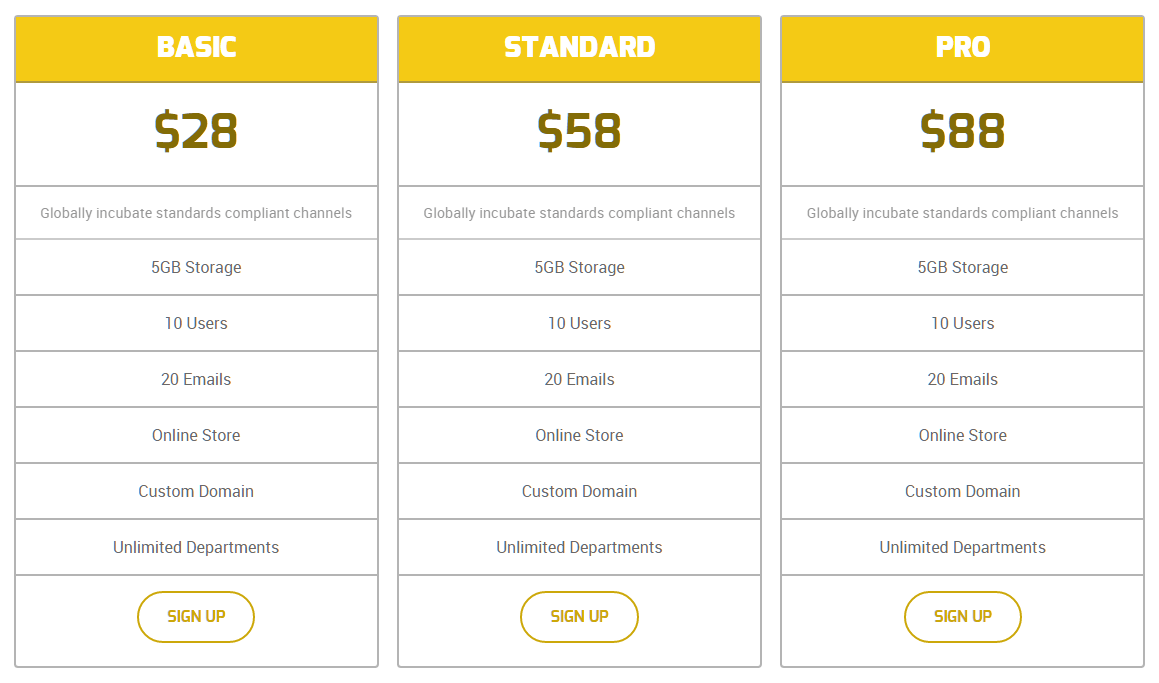
<div class="g-grid">
  <div class="g-block size-33-3">
    <div class="g-content">
      <ul class="g-pricingtable">
        <li class="g-pricingtable-title">Basic
        </li>
        <li class="g-pricingtable-price">$28
        </li>
        <li class="g-pricingtable-desc">Globally incubate standards compliant channels
        </li>
        <li class="g-pricingtable-item">5GB Storage
        </li>
        <li class="g-pricingtable-item">10 Users
        </li>
        <li class="g-pricingtable-item">20 Emails
        </li>
        <li class="g-pricingtable-item">Online Store
        </li>
        <li class="g-pricingtable-item">Custom Domain
        </li>
        <li class="g-pricingtable-item">Unlimited Departments
        </li>
        <li class="g-pricingtable-cta">
          <a class="button button-3" href="http://www.rockettheme.com/joomla/templates/xenon">Sign Up</a>
        </li>
      </ul>
    </div>
  </div>
  <div class="g-block size-33-3">
    <div class="g-content">
      <ul class="g-pricingtable">
        <li class="g-pricingtable-title">Standard
        </li>
        <li class="g-pricingtable-price">$58
        </li>
        <li class="g-pricingtable-desc">Globally incubate standards compliant channels
        </li>
        <li class="g-pricingtable-item">5GB Storage
        </li>
        <li class="g-pricingtable-item">10 Users
        </li>
        <li class="g-pricingtable-item">20 Emails
        </li>
        <li class="g-pricingtable-item">Online Store
        </li>
        <li class="g-pricingtable-item">Custom Domain
        </li>
        <li class="g-pricingtable-item">Unlimited Departments
        </li>
        <li class="g-pricingtable-cta">
          <a class="button button-3" href="http://www.rockettheme.com/joomla/templates/xenon">Sign Up</a>
        </li>
      </ul>
    </div>
  </div>
  <div class="g-block size-33-3">
    <div class="g-content">
      <ul class="g-pricingtable">
        <li class="g-pricingtable-title">Pro
        </li>
        <li class="g-pricingtable-price">$88
        </li>
        <li class="g-pricingtable-desc">Globally incubate standards compliant channels
        </li>
        <li class="g-pricingtable-item">5GB Storage
        </li>
        <li class="g-pricingtable-item">10 Users
        </li>
        <li class="g-pricingtable-item">20 Emails
        </li>
        <li class="g-pricingtable-item">Online Store
        </li>
        <li class="g-pricingtable-item">Custom Domain
        </li>
        <li class="g-pricingtable-item">Unlimited Departments
        </li>
        <li class="g-pricingtable-cta">
          <a class="button button-3" href="http://www.rockettheme.com/joomla/templates/xenon">Sign Up</a>
        </li>
      </ul>
    </div>
  </div>
</div>
Basic
| Option | Setting |
|---|---|
| Prepare Content | No |
| Select a Background Image | Blank |
Advanced
| Option | Setting |
|---|---|
| Module Class Suffix | Blank |
Mainbar Section

The Mainbar section includes the Pricing article, displayed through the Page Content particle. Here are the settings found in the Pricing article.
| Option | Setting |
|---|---|
| Title | Pricing |
| Alias | pricing |
| Status | Published |
| Featured | No |
| Category | Sample Pages |
Content Body
<div class="g-block  size-100">
  <div class="g-content">
    <h2 class="g-title">
      Try it Out for 10 Days Free
    </h2>
    <ul>
      <li>All plans come with awesome support by email and phone. There is no hidden fee!
      </li>
      <li>Free <strong>10 days trial</strong> on all plans. No credit card needed! Need a bigger plan? <a href="http://www.rockettheme.com/joomla/templates/antares">View Professional Plan</a>.
      </li>
    </ul>
  </div>
</div>
Expanded Section

This area of the page is an Image Grid particle placed within a Gantry 5 Particle module in the expanded-a module position. We have included the settings for this particle below.
Info List (Particle)
Particle Settings
| Field | Setting |
|---|---|
| Particle Name | Image Grid |
| CSS Classes | Blank |
| Title | None |
| Intro | None |
| Grid Column | 4 Columns |
| Album | clients |
| Image Grid Item 1 Name | Image 1 |
| Image Grid Item 1 Promo Image | Custom |
| Image Grid Item 1 Caption | Image 1 |
Extension Section

This area of the page is an Info List particle placed within a Gantry 5 Particle module in the extension-a module position. We have included the settings for this particle below.
Info List Particle
Gantry 5 Particle Module Details
| Field | Setting |
|---|---|
| Title | Pricing - No Hidden Fees |
| Show Title | Hide |
| Position | bottom-a |
| Status | Published |
Particle Settings
| Option | Setting |
|---|---|
| CSS Classes |
center, g-layercontent, noborder
|
| Title | Blank |
| Intro | Blank |
| Grid Column | 1 Column |
| Info Lists Item 1 Name | No Hidden Fees |
| Info Lists Item 1 Image | Blank |
| Info Lists Item 1 Image Location | Left |
| Info Lists Item 1 Text Style | Header |
| Info Lists Item 1 Image Style | Compact |
| Info Lists Item 1 Description | No Credit Card Required and No Long-Term Contracts |
| Info Lists Item 1 Tag | Blank |
| Info Lists Item 1 Sub Tag | Blank |
| Info Lists Item 1 Label | Sign Up |
| Info Lists Item 1 Link | http://www.rockettheme.com/joomla/templates/antares |
| Info Lists Item 1 Icon | Blank |
| Info Lists Item 1 Read More Classes | Blank |
Bottom Section
-
 1Custom HTML (Module)2Newsletter (Particle)3Custom HTML (Module)
This area of the page is made up of three items. Two of them are Custom HTML modules, with a Newsletter particle in-between. These items are placed in the Bottom A, Bottom B, and Bottom C module positions which each are set at 33.3% width.
Custom HTML (Module)
The Custom HTML module here was placed in the Bottom A module position. The module position is created within the layout manager by using a Module Position particle. The particle is assigned bottom-a as a key and gantry as its Chrome.
Below, you will find the module settings we used in the demo:
Module Settings
| Field | Setting |
|---|---|
| Title | About Antares |
| Content | Antares is available for purchase or part of a club membership from RocketTheme, inclusive of the RocketLauncher, template and addons. |
| Show Title | Show |
| Position | bottom-a |
Newsletter (Particle)
The Newsletter particle here was placed in the Bottom B module position. The module position is created within the layout manager by using a Particle Position particle. The particle is assigned bottom-b as a key and gantry as its Chrome.
Below, you will find the particle settings we used in the demo:
Particle Settings
| Field | Setting |
|---|---|
| Particle Name | Newsletter |
| CSS Classes | Blank |
| Title | Subscribe Here |
| Heading Text | Subscribe to our newsletter and stay updated on the latest developments and special offers! |
| InputBox Text | Email Address |
| Button Text | Join |
| Feedburner URI | Custom |
| Button Classes | button-4 |
Custom HTML (Module)
The Custom HTML module here was placed in the Bottom C module position. The module position is created within the layout manager by using a Module Position particle. The particle is assigned bottom-c as a key and gantry as its Chrome.
Below, you will find the module settings we used in the demo:
Module Settings
| Field | Setting |
|---|---|
| Title | Sample Sitemap |
| Show Title | Show |
| Position | bottom-c |
Content
<div class="g-grid g-sample-sitemap">
<div class="g-block">
<ul class="nomarginall noliststyle">
<li><a href="/index.php">Home</a></li>
<li><a href="/component/gantry5/?amp;view=custom&Itemid=105">Features</a></li>
<li><a href="/component/gantry5/?amp;view=custom&Itemid=106"><span class="hidden-tablet">Typography</span><span class="visible-tablet">Content</span></a></li>
<li><a href="/component/gantry5/?amp;view=custom&Itemid=168">Particles</a></li>
<li><a href="/?amp;view=article&id=3&Itemid=107">Variations</a></li>
</ul>
</div>
<div class="g-block">
<ul class="nomarginall noliststyle">
<li><a href="/component/gantry5/?amp;view=custom&Itemid=106">Buttons</a></li>
<li><a href="/component/gantry5/?amp;view=custom&Itemid=105">Pages</a></li>
<li><a href="http://www.rockettheme.com/docs/joomla/templates/antares">Guide</a></li>
<li><a href="http://www.rockettheme.com/forum/joomla-template-antares">Support</a></li>
<li><a href="http://www.rockettheme.com/joomla/templates/antares">Download</a></li>
</ul>
</div>
</div>